GFW详细分析及翻墙原理
时间:2020-01-14 来源: 作者: 条评论
提醒:旧文新登,仅供参考!

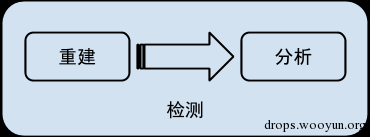


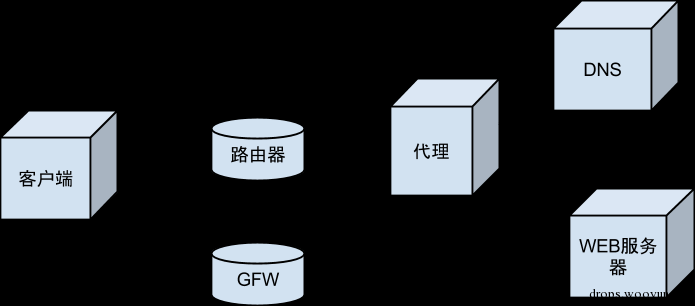
穿墙原理
实验环境准备
穿墙比翻墙要复杂得多,但也有意思得多。本章节以实验为主。实验的设备是家庭用的路由器,我用的是水星4530R。需要有公网IP。刷的操作系统是OpenWRT Attitude Adjustment 12.09 rc-1版本。使用的包有:
- NetfilterQueue( https://github.com/fqrouter/fqrouter 中有)
- bind-dig
- shadow
- dpkt (不是OpenWRT的包,是python的 http://dpkt.googlecode.com/files/dpkt-1.7.tar.gz )
本文并不打算详细讲解实验环境的设置。对于有OpenWRT编译和刷机经验的朋友可能可以按照我的叙述重建出实验环境来。整个实验的关键在于
- 公网上的ip地址
- Linux
- python
- python访问netfilter queue的库
如果你有一台公网上的Linux机器,安装了Python和Python的 NetfilterQueue ,也可以进行同样的实验。
如果你使用的是路由器,需要验证你有公网ip。这个可以访问ifconfig.me来证实。其次要保证路由器是OpenWRT的并且有足够的空间安装python-mini。到这里基本上都和普通的OpenWRT刷机没有什么两样。重点在于:
安装Python的NetfilterQueue
OpenWRT提供了NetfilterQueue的C的库。但是使用C来做实验太笨重了。所以我选择了Python。但是Python的NetfilterQueue的库没有在OpenWRT中。下载 https://github.com/fqrouter/fqrouter 解压后可以得到一个名字叫fqrouter的目录。然后给feeds.conf添加一行src-link fqrouter /opt/fqrouter/package。把/opt/fqrouter替换为你解压的目录。然后scripts/feeds update -a,再执行scripts/feeds install python-netfilterqueue就添加好了。然后在make menuconfig中选择Languages=>Python=>python-netfilterqueue。
有了这个库就赋予了我们使用Python任意抓包,修改包和发包的能力。在OpenWRT上,除了python没有第二种脚本语言可以如此简单地获得这些能力。
安装Python的dpkt
能够抓取和发送IP包之后,第二个头疼的问题是如何解析和构造任意的IP包。Python有一个库叫dpkt可以帮我们很好地完成这项任务。这是我们选择Python做实验的第二个重要理由。
在路由器上直接下载 http://dpkt.googlecode.com/files/dpkt-1.7.tar.gz ,然后解压缩,拷贝其中的dpkt目录到 /usr/lib/python2.7/site-packages 下。
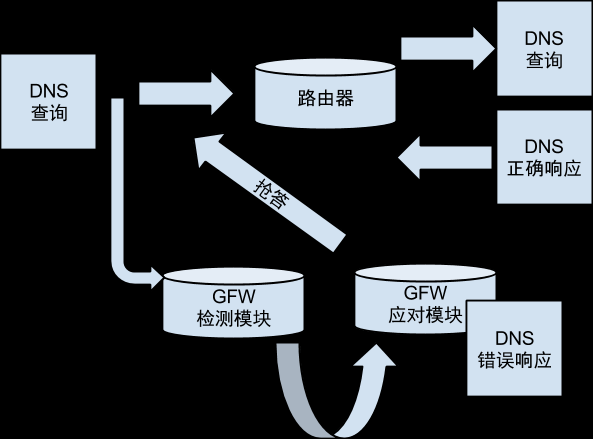
DNS劫持观测
我们要做的第一个实验是用python代码观测到DNS劫持的全过程。
应用层观测
dig是DNS的客户端,可以很方便地构造出我们想要的DNS请求。 dig @8.8.8.8 twitter.com 。可以得到相应如下
; (1 server found)
;; global options: +cmd
;; Got answer:
;; ->>HEADER<<- opcode: QUERY, status: NOERROR, id: 5494
;; flags: qr rd ra; QUERY: 1, ANSWER: 1, AUTHORITY: 0, ADDITIONAL: 0

;; QUESTION SECTION:
;twitter.com.                        IN        A

;; ANSWER SECTION:
twitter.com.                4666        IN        A        59.24.3.173

;; Query time: 110 msec
;; SERVER: 8.8.8.8#53(8.8.8.8)
;; WHEN: Sun Jan 13 13:22:10 2013
;; MSG SIZE  rcvd: 45
可以很清楚地看到我们得到的错误答案59.24.3.173。
抓包观测
使用iptables我们可以让特定的IP包经过应用层的代码,从而使得我们用python观测DNS查询过程提供了可能。代码如下,保存文件名dns_hijacking_obversation.py( https://gist.github.com/4524294 ):
from netfilterqueue import NetfilterQueue
import subprocess
import signal

def observe_dns_hijacking(nfqueue_element):
   print('packet past through me')
   nfqueue_element.accept()

nfqueue = NetfilterQueue()
nfqueue.bind(0, observe_dns_hijacking)

def clean_up(*args):
   subprocess.call('iptables -D OUTPUT -p udp --dst 8.8.8.8 -j QUEUE', shell=True)
   subprocess.call('iptables -D INPUT -p udp --src 8.8.8.8 -j QUEUE', shell=True)

signal.signal(signal.SIGINT, clean_up)

try:
   subprocess.call('iptables -I INPUT -p udp --src 8.8.8.8 -j QUEUE', shell=True)
   subprocess.call('iptables -I OUTPUT -p udp --dst 8.8.8.8 -j QUEUE', shell=True)
   print('running..')
   nfqueue.run()
except KeyboardInterrupt:
   print('bye')
执行python dns_hijacking_observation.py,再使用dig @8.8.8.8 twitter.com应该可以看到package past through me。这就说明DNS的请求和答案都经过了python代码了。
上一步主要是验证NetfilterQueue是不是工作正常。这一步则要靠dpkt的了。代码如下,文件名相同( https://gist.github.com/4524299 ):
from netfilterqueue import NetfilterQueue
import subprocess
import signal
import dpkt
import traceback
import socket

def observe_dns_hijacking(nfqueue_element):
   try:
       ip_packet = dpkt.ip.IP(nfqueue_element.get_payload())
       dns_packet = dpkt.dns.DNS(ip_packet.udp.data)
       print(repr(dns_packet))
       for answer in dns_packet.an:
           print(socket.inet_ntoa(answer['rdata']))
       nfqueue_element.accept()
   except:
       traceback.print_exc()
       nfqueue_element.accept()

nfqueue = NetfilterQueue()
nfqueue.bind(0, observe_dns_hijacking)

def clean_up(*args):

   subprocess.call('iptables -D OUTPUT -p udp --dst 8.8.8.8 -j QUEUE', shell=True)
   subprocess.call('iptables -D INPUT -p udp --src 8.8.8.8 -j QUEUE', shell=True)

signal.signal(signal.SIGINT, clean_up)

try:
   subprocess.call('iptables -I INPUT -p udp --src 8.8.8.8 -j QUEUE', shell=True)
   subprocess.call('iptables -I OUTPUT -p udp --dst 8.8.8.8 -j QUEUE', shell=True)
   print('running..')
   nfqueue.run()
except KeyboardInterrupt:
   print('bye')
执行python dns_hijacking_observation.py,再使用dig @8.8.8.8 twitter.com应该可以看到类似如下的输出:
DNS(ar=[RR(type=41, cls=4096)], qd=[Q(name='twitter.com')], id=8613, op=288)
DNS(an=[RR(name='twitter.com', rdata=';\x18\x03\xad', ttl=19150)], qd=[Q(name='twitter.com')], id=8613, op=33152)
.24.3.173
DNS(an=[RR(name='twitter.com', rdata='\xc7;\x95\xe6', ttl=27), RR(name='twitter.com', rdata='\xc7;\x96\x07', ttl=27), RR(name='twitter.com', rdata="\xc7;\x96'", ttl=27)], ar=[RR(type=41, cls=512)], qd=[Q(name='twitter.com')], id=8613, op=33152)
.59.149.230
.59.150.7
.59.150.39
可以看到我们发出去了一个包,收到了两个包。其中第一个收到的包是GFW发回来的错误答案,第二个包才是正确的答案。但是由于dig只取第一个返回的答案,所以我们实际看到的解析结果是错误的。
观测劫持发生的位置
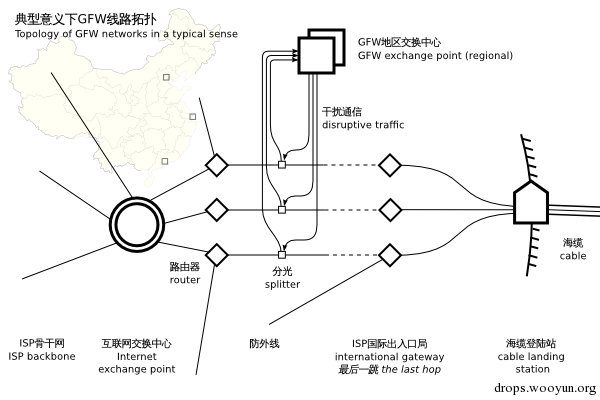
利用IP包的TTL特性,我们可以把TTL值从1开始递增,直到我们收到错误的应答为止。结合TTL EXECEEDED ICMP返回的IP地址,就可以知道DNS请求是在第几跳的路由器分光给GFW的。代码如下( https://gist.github.com/4524927 ):
from netfilterqueue import NetfilterQueue
import subprocess
import signal
import dpkt
import traceback
import socket
import sys

DNS_IP = '8.8.8.8'

# source http://zh.wikipedia.org/wiki/%E5%9F%9F%E5%90%8D%E6%9C%8D%E5%8A%A1%E5%99%A8%E7%BC%93%E5%AD%98%E6%B1%A1%E6%9F%93
WRONG_ANSWERS = {
   '4.36.66.178',
   '8.7.198.45',
   '37.61.54.158',
   '46.82.174.68',
   '59.24.3.173',
   '64.33.88.161',
   '64.33.99.47',
   '64.66.163.251',
   '65.104.202.252',
   '65.160.219.113',
   '66.45.252.237',
   '72.14.205.99',
   '72.14.205.104',
   '78.16.49.15',
   '93.46.8.89',
   '128.121.126.139',
   '159.106.121.75',
   '169.132.13.103',
   '192.67.198.6',
   '202.106.1.2',
   '202.181.7.85',
   '203.161.230.171',
   '207.12.88.98',
   '208.56.31.43',
   '209.36.73.33',
   '209.145.54.50',
   '209.220.30.174',
   '211.94.66.147',
   '213.169.251.35',
   '216.221.188.182',
   '216.234.179.13'
}

current_ttl = 1

def locate_dns_hijacking(nfqueue_element):
   global current_ttl
   try:
       ip_packet = dpkt.ip.IP(nfqueue_element.get_payload())
       if dpkt.ip.IP_PROTO_ICMP == ip_packet['p']:
           print(socket.inet_ntoa(ip_packet.src))
       elif dpkt.ip.IP_PROTO_UDP == ip_packet['p']:
           if DNS_IP == socket.inet_ntoa(ip_packet.dst):
               ip_packet.ttl = current_ttl
               current_ttl += 1
               ip_packet.sum = 0
               nfqueue_element.set_payload(str(ip_packet))
           else:
               if contains_wrong_answer(dpkt.dns.DNS(ip_packet.udp.data)):
                   sys.stdout.write('* ')
                   sys.stdout.flush()
                   nfqueue_element.drop()
                   return
               else:
                   print('END')
       nfqueue_element.accept()
   except:
       traceback.print_exc()
       nfqueue_element.accept()

def contains_wrong_answer(dns_packet):
   for answer in dns_packet.an:
       if socket.inet_ntoa(answer['rdata']) in WRONG_ANSWERS:
           return True
   return False

nfqueue = NetfilterQueue()
nfqueue.bind(0, locate_dns_hijacking)

def clean_up(*args):
   subprocess.call('iptables -D OUTPUT -p udp --dst %s -j QUEUE' % DNS_IP, shell=True)
   subprocess.call('iptables -D INPUT -p udp --src %s -j QUEUE' % DNS_IP, shell=True)
   subprocess.call('iptables -D INPUT -p icmp -m icmp --icmp-type 11 -j QUEUE', shell=True)

signal.signal(signal.SIGINT, clean_up)

try:
   subprocess.call('iptables -I INPUT -p icmp -m icmp --icmp-type 11 -j QUEUE', shell=True)
   subprocess.call('iptables -I INPUT -p udp --src %s -j QUEUE' % DNS_IP, shell=True)
   subprocess.call('iptables -I OUTPUT -p udp --dst %s -j QUEUE' % DNS_IP, shell=True)
   print('running..')
   nfqueue.run()
except KeyboardInterrupt:
   print('bye')
执行 dig +tries=30 +time=1 @8.8.8.8 twitter.com 可以得到类似下面的输出:
=== 隐去 ===
=== 隐去 ===
=== 隐去 ===
.158.100.166
.158.11.150
* 219.158.97.30
* * 219.158.27.30
* 72.14.215.130
* 209.85.248.60
* 216.239.43.19
* * END
出现*号前面的那个IP就是挂了GFW的路由了。脚本只能执行一次,第二次需要重启。另外同一个DNS不能被同时查询,把8.8.8.8改成你没有在用的DNS。这个脚本的一个“副作用”就是dig返回的答案是正确的了,因为错误的答案被丢弃了。
反向观测
前面我们已经知道从国内请求国外的DNS服务器大体是怎么一个被劫持的过程了。接下来我们在国内搭建一个服务器,从国外往国内发请求,看看是不是可以观测到被劫持的现象。
把路由器的WAN口的防火墙打开。配置本地的dnsmasq为使用非标准端口代理查询从而保证本地做dig查询的时候可以拿到正确的结果。然后在国外的服务器上执行
dig @国内路由器ip twitter.com
可以看到收到的答案是错误的。执行前面的路由跟踪代码,结果如下:
=== 隐去 ===
=== 隐去 ===
=== 隐去 ===
.160.187.13
.248.76.73
.158.33.181
.158.29.129
.158.19.165
* 219.158.96.225
* * * 219.158.101.233
END
可以看到不但有DNS劫持,而且DNS劫持发生在非常靠近国内路由器的位置。这也证实了论文中提出的观测结果。GFW并没有严格地部署在出国境前第一跳的位置,而是更加靠前。并且是双向的,至少DNS劫持是双向经过实验证实了。
通过避免GFW重建请求反DNS劫持
使用非标准端口
这个实验就非常简单了。使用53之外的端口查询DNS,观测是否有错误答案被返回。
dig @208.67.222.222 -p 5353 twitter.com
使用的DNS服务器是OpenDNS,端口为5353端口。使用非标准端口的DNS服务器不多,并不是所有的DNS服务器都会提供非标准端口供查询。结果如下:
; <<>> DiG 9.9.1-P3 <<>> @208.67.222.222 -p 5353 twitter.com
; (1 server found)
;; global options: +cmd
;; Got answer:
;; ->>HEADER<<- opcode: QUERY, status: NOERROR, id: 5367
;; flags: qr rd ra; QUERY: 1, ANSWER: 3, AUTHORITY: 0, ADDITIONAL: 1

;; OPT PSEUDOSECTION:
; EDNS: version: 0, flags:; udp: 8192
;; QUESTION SECTION:
;twitter.com.                        IN        A

;; ANSWER SECTION:
twitter.com.                5        IN        A        199.59.150.39
twitter.com.                5        IN        A        199.59.148.82
twitter.com.                5        IN        A        199.59.148.10

;; Query time: 194 msec
;; SERVER: 208.67.222.222#5353(208.67.222.222)
;; WHEN: Mon Jan 14 11:47:46 2013
;; MSG SIZE  rcvd: 88
可见,非标准端口还是可以得到正确结果的。但是这种穿墙并不能被应用程序直接使用,因为几乎所有的应用程序都不支持使用非标准端口查询。有很多种办法把端口变成53端口能用。
- 使用本地DNS服务器转发(dnsmasq,pdnsd)
- 用NetfilterQueue改写IP包
- 用iptables改写IP包:
iptables -t nat -I OUTPUT --dst 208.67.222.222 -p udp --dport 53 -j DNAT --to-destination 208.67.222.222:5353
使用TCP查询
这个实验就更加简单了,也是一条命令:
dig +tcp @8.8.8.8 twitter.com
GFW在日常是不屏蔽TCP的DNS查询的,所以可以得到正确的结果。但是和非标准端口一样,几乎所有的应用程序都不支持使用TCP查询。已知的TCP转 UDP方式是使用pdnsd或者unbound转(http://otnth.blogspot.jp/2012/05/openwrt- dns.html?m=1)。
但是GFW现在不屏蔽TCP的DNS查询并不代表GFW不能这么干。做一个小实验:
root@OpenWrt:~# dig +tcp @8.8.8.8 dl.dropbox.com
;; communications error to 8.8.8.8#53: connection reset
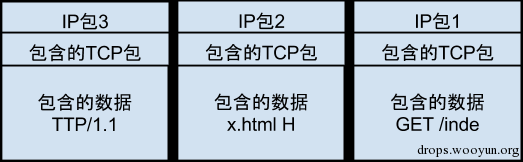
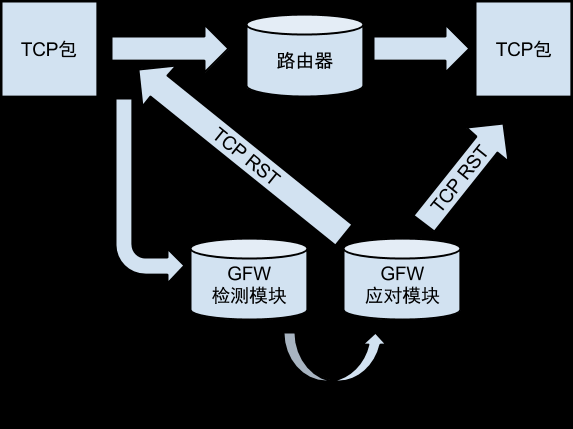
可以看到GFW是能够知道你在查询什么的。与HTTP关键字过滤一样,一旦发现查询的内容不恰当,立马就发RST包过来切断连接。那么为什么GFW不审查 所有的TCP的DNS查询呢?原因很简单,用TCP查询的绝对少数,尚不值得这么去干。而且就算你能查询到正确域名,GFW自认为还有HTTP关键字过滤 和封IP等后着守着呢,犯不着在DNS上卡这么死。
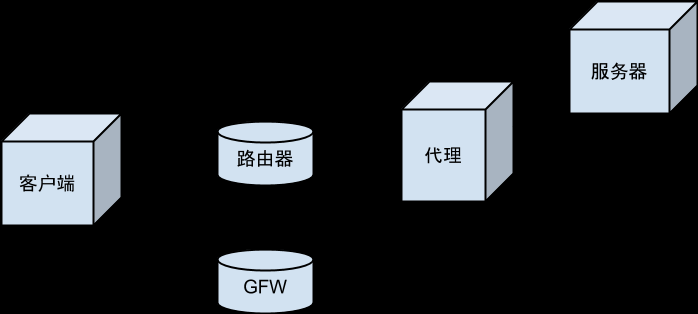
使用单向代理
严格来说单向代理并不是穿墙,因为它仍然需要在国外有一个代理服务器。使用代理服务器把DNS查询发出去,但是DNS查询并不经由代理服务器而是直接发回 客户端。这样的实现在目前有更好的反劫持的手段(比如非标准端口)的情况下并不是一个有实际意义的做法。但是对于观测GFW的封锁机制还是有帮助的。据报 道在敏感时期,对DNS不仅仅是劫持,而是直接丢包。通过单向代理可以观测丢包是针对出境流量的还是入境流量的。
客户端需要使用iptables把DNS请求转给NetfilterQueue,然后用python代码把DNS请求包装之后发给中转代理。对于应用程序来说,这个包装的过程是透明的,它仍然认为请求是直接发给DNS服务器的。
客户端代码如下,名字叫smuggler.py( https://gist.github.com/4531012 ):
from netfilterqueue import NetfilterQueue
import subprocess
import signal
import traceback
import socket

IMPERSONATOR_IP = 'x.x.x.x'
IMPERSONATOR_PORT = 19840

udp_socket = socket.socket(socket.AF_INET, socket.SOCK_DGRAM, socket.IPPROTO_UDP)

def smuggle_packet(nfqueue_element):
   try:
       original_packet = nfqueue_element.get_payload()
       print('smuggled')
       udp_socket.sendto(original_packet, (IMPERSONATOR_IP, IMPERSONATOR_PORT))
       nfqueue_element.drop()
   except:
       traceback.print_exc()
       nfqueue_element.accept()

nfqueue = NetfilterQueue()
nfqueue.bind(0, smuggle_packet)

def clean_up(*args):
   subprocess.call('iptables -D OUTPUT -p udp --dst 8.8.8.8 --dport 53 -j QUEUE', shell=True)

signal.signal(signal.SIGINT, clean_up)

try:
   subprocess.call('iptables -I OUTPUT -p udp --dst 8.8.8.8 --dport 53 -j QUEUE', shell=True)
   print('running..')
   nfqueue.run()
except KeyboardInterrupt:
   print('bye')
服务器端代码如下,名字叫impersonator.py:
import socket
import dpkt.ip

def main_loop(server_socket, raw_socket):
    while True:
        packet_bytes, from_ip = server_socket.recvfrom(4096)
        packet = dpkt.ip.IP(packet_bytes)
        dst = socket.inet_ntoa(packet.dst)
        print('%s:%s => %s:%s' % (socket.inet_ntoa(packet.src), packet.data.sport, dst, packet.data.dport))
        raw_socket.sendto(packet_bytes, (dst, 0))

server_socket = socket.socket(socket.AF_INET, socket.SOCK_DGRAM)
try:
    server_socket.bind(('0.0.0.0', 19840))
    raw_socket = socket.socket(socket.AF_INET, socket.SOCK_RAW, socket.IPPROTO_RAW)
    try:
        raw_socket.setsockopt(socket.SOL_IP, socket.IP_HDRINCL, 1)
        main_loop(server_socket, raw_socket)
    finally:
        raw_socket.close()
finally:
    server_socket.close()
在路由器上运行的时候要把WAN的防火墙规则改为接受INPUT,否则进入的UDP包会因为没有对应的出去的UDP包而被过滤掉。这是单向代理的一个缺 陷,需要在墙上开洞。把防火墙整个打开是一种开洞的极端方式。后面专门讨论单向代理的时候会有更多关于防火墙凿洞的讨论。
第二个运行的条件是服务器所在的网络没有对IP SPROOFING做过滤。服务器实际上使用了和GFW发错误答案一样的技术,就是伪造SRC地址。通过把SRC地址填成客户端所在的IP地址,使得DNS查询的结果不需要经过代理服务器中装直接到达客户端。

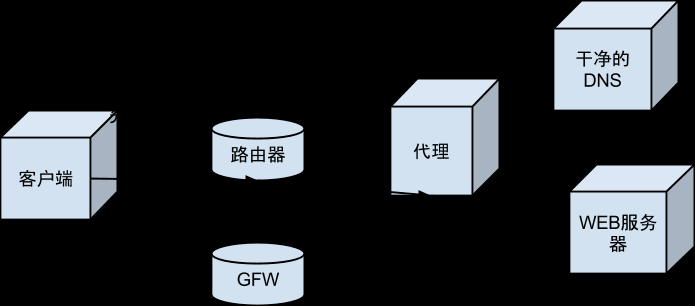
通过丢弃错误答案反DNS劫持
使用iptables过滤
前两种方式都是针对GFW的重建这一步。因为GFW没有在日常的时候监听所有UDP端口以及监听TCP流量,所以非标准端口或者TCP的DNS查询可以被 放行。选择性丢包则针对的是GFW的应对措施。既然GFW发错误的答案回来,只要我们不认它给的答案,等正确的答案来就是了。有两篇相关文档
改写成python脚本是这样的( https://gist.github.com/4530465 ),实现来自于 AntiDNSPoisoning :
import sys
import subprocess

# source http://zh.wikipedia.org/wiki/%E5%9F%9F%E5%90%8D%E6%9C%8D%E5%8A%A1%E5%99%A8%E7%BC%93%E5%AD%98%E6%B1%A1%E6%9F%93
WRONG_ANSWERS = {
    '4.36.66.178',
    '8.7.198.45',
    '37.61.54.158',
    '46.82.174.68',
    '59.24.3.173',
    '64.33.88.161',
    '64.33.99.47',
    '64.66.163.251',
    '65.104.202.252',
    '65.160.219.113',
    '66.45.252.237',
    '72.14.205.99',
    '72.14.205.104',
    '78.16.49.15',
    '93.46.8.89',
    '128.121.126.139',
    '159.106.121.75',
    '169.132.13.103',
    '192.67.198.6',
    '202.106.1.2',
    '202.181.7.85',
    '203.161.230.171',
    '207.12.88.98',
    '208.56.31.43',
    '209.36.73.33',
    '209.145.54.50',
    '209.220.30.174',
    '211.94.66.147',
    '213.169.251.35',
    '216.221.188.182',
    '216.234.179.13'
}

rules = ['-p udp --sport 53 -m u32 --u32 "4 & 0x1FFF = 0 && 0 >> 22 & 0x3C @ 8 & 0x8000 = 0x8000 && 0 >> 22 & 0x3C @ 14 = 0" -j DROP']
for wrong_answer in WRONG_ANSWERS:
    hex_ip = ' '.join(['%02x' % int(s) for s in wrong_answer.split('.')])
    rules.append('-p udp --sport 53 -m string --algo bm --hex-string "|%s|" --from 60 --to 180  -j DROP' % hex_ip)

try:
    for rule in rules:
        print(rule)
        subprocess.call('iptables -I INPUT %s' % rule, shell=True)
    print('running..')
    sys.stdin.readline()
except KeyboardInterrupt:
    print('bye')
finally:
    for rule in reversed(rules):
        subprocess.call('iptables -D INPUT %s' % rule, shell=True)
本地有了这些iptables规则之后就可以丢弃掉GFW发回来的错误答案,从而得到正确的解析结果。这个脚本用到了两个iptables模块一个是 u32一个是string。这两个内核模块不是所有的linux机器都有的。比如大部分的Android手机都没有这两个内核模块。所以上面的脚本适合内 核模块很容易安装的场景,比如你的ubuntu pc。因为linux的内核模块与内核版本(每次编译基本都不同)是一一对应的,所以不同的linux机器是无法共享同样的内核模块的。所以基于内核模块 的方案天然地具有安装困难的缺陷。
使用nfqueue过滤
对于没有办法自己安装或者编译内核模块的场景,比如最常见的Android手机,厂家不告诉你内核的具体版本以及编译参数,普通用户是没有办法重新编译 linux内核的。对于这样的情况,iptables提供了nfqueue,我们可以把内核模块做的ip过滤的工作交给用户态(也就是普通的应用程序)来 完成。
CLEAN_DNS = '8.8.8.8'

RULES = []
for iface in network_interface.list_data_network_interfaces():
    # this rule make sure we always query from the "CLEAN" dns
    RULE_REDIRECT_TO_CLEAN_DNS = (
        {'target': 'DNAT', 'iface_out': iface, 'extra': 'udp dpt:53 to:%s:53' % CLEAN_DNS},
        ('nat', 'OUTPUT', '-o %s -p udp --dport 53 -j DNAT --to-destination %s:53' % (iface, CLEAN_DNS))
    )
    RULES.append(RULE_REDIRECT_TO_CLEAN_DNS)
    RULE_DROP_PACKET = (
        {'target': 'NFQUEUE', 'iface_in': iface, 'extra': 'udp spt:53 NFQUEUE num 1'},
        ('filter', 'INPUT', '-i %s -p udp --sport 53 -j NFQUEUE --queue-num 1' % iface)
    )
    RULES.append(RULE_DROP_PACKET)

# source http://zh.wikipedia.org/wiki/%E5%9F%9F%E5%90%8D%E6%9C%8D%E5%8A%A1%E5%99%A8%E7%BC%93%E5%AD%98%E6%B1%A1%E6%9F%93
WRONG_ANSWERS = {
    '4.36.66.178',
    '8.7.198.45',
    '37.61.54.158',
    '46.82.174.68',
    '59.24.3.173',
    '64.33.88.161',
    '64.33.99.47',
    '64.66.163.251',
    '65.104.202.252',
    '65.160.219.113',
    '66.45.252.237',
    '72.14.205.99',
    '72.14.205.104',
    '78.16.49.15',
    '93.46.8.89',
    '128.121.126.139',
    '159.106.121.75',
    '169.132.13.103',
    '192.67.198.6',
    '202.106.1.2',
    '202.181.7.85',
    '203.161.230.171',
    '203.98.7.65',
    '207.12.88.98',
    '208.56.31.43',
    '209.36.73.33',
    '209.145.54.50',
    '209.220.30.174',
    '211.94.66.147',
    '213.169.251.35',
    '216.221.188.182',
    '216.234.179.13',
    '243.185.187.39'
}

def handle_nfqueue():
    try:
        nfqueue = NetfilterQueue()
        nfqueue.bind(1, handle_packet)
        nfqueue.run()
    except:
        LOGGER.exception('stopped handling nfqueue')
        dns_service_status.error = traceback.format_exc()

def handle_packet(nfqueue_element):
    try:
        ip_packet = dpkt.ip.IP(nfqueue_element.get_payload())
        dns_packet = dpkt.dns.DNS(ip_packet.udp.data)
        if contains_wrong_answer(dns_packet):
        # after the fake packet dropped, the real answer can be accepted by the client
            LOGGER.debug('drop fake dns packet: %s' % repr(dns_packet))
            nfqueue_element.drop()
            return
        nfqueue_element.accept()
        dns_service_status.last_activity_at = time.time()
    except:
        LOGGER.exception('failed to handle packet')
        nfqueue_element.accept()

def contains_wrong_answer(dns_packet):
    if dpkt.dns.DNS_A not in [question.type for question in dns_packet.qd]:
        return False # not answer to A question, might be PTR
    for answer in dns_packet.an:
        if dpkt.dns.DNS_A == answer.type:
            resolved_ip = socket.inet_ntoa(answer['rdata'])
            if resolved_ip in WRONG_ANSWERS:
                return True # to find wrong answer
            else:
                LOGGER.info('dns resolve: %s => %s' % (dns_packet.qd[0].name, resolved_ip))
                return False # if the blacklist is incomplete, we will think it is right answer
    return True # to find empty answer
其原理是一样的,过滤所有的DNS应答,如果发现是错误的答案就丢弃。因为是基于nfqueue的,所以只要linux内核支持nfqueue,而且 iptables可以添加nfqueue的target,就可以使用以上方式来丢弃DNS错误答案。目前已经成功在主流的android手机上运行该程 序,并获得正确的DNS解析结果。另外,上面的实现利用iptables的重定向能力,达到了更换本机dns服务器的目的。无论机器设置的dns服务器是 什么,通过上面的iptables规则,统统给你重定向到干净的DNS(8.8.8.8)。
自此DNS穿墙的讨论基本上就完成了。DNS劫持是所有GFW封锁手段中最薄弱的一环,有很多种方法都可以穿过。如果不想写代码,用V2EX DNS的非标准端口是最容易的部署方式。如果愿意部署代码,用nfqueue丢弃错误答案是最可靠通用的方式,不依赖于特定的服务器。fqdns集成了所 有的克服DNS劫持的手段,其为fqrouter的组成部分之一: https://github.com/fqrouter/fqdns
封IP观测
观测twitter.com
首先使用dig获得twitter.com的ip地址:
root@OpenWrt:~# dig +tcp @8.8.8.8 twitter.com

; <<>> DiG 9.9.1-P3 <<>> +tcp @8.8.8.8 twitter.com
; (1 server found)
;; global options: +cmd
;; Got answer:
;; ->>HEADER<<- opcode: QUERY, status: NOERROR, id: 8015
;; flags: qr rd ra; QUERY: 1, ANSWER: 3, AUTHORITY: 0, ADDITIONAL: 1

;; OPT PSEUDOSECTION:
; EDNS: version: 0, flags:; udp: 512
;; QUESTION SECTION:
;twitter.com.                        IN        A

;; ANSWER SECTION:
twitter.com.                7        IN        A        199.59.149.230
twitter.com.                7        IN        A        199.59.150.39
twitter.com.                7        IN        A        199.59.150.7
根据前面的内容我们知道使用dns over tcp,大部分的域名解析都不会被干扰的。这里得到了三个ip地址。先来测试199.59.149.230
root@OpenWrt:~# traceroute 199.59.149.230 -n
traceroute to 199.59.149.230 (199.59.149.230), 30 hops max, 38 byte packets
  123.114.32.1  19.862 ms  4.267 ms  101.431 ms
  61.148.163.73  920.148 ms  5.108 ms  3.868 ms
  124.65.56.129  7.596 ms  7.742 ms  7.735 ms
  123.126.0.133  5.310 ms  7.745 ms  7.573 ms
  *  *  *
  *  *  *
这个结果是最常见的。在骨干路由器上,针对这个ip丢包了。这种封锁方式就是最传统的封IP方式,BGP路由扩散,现象就是针对上行流量的丢包。再来看199.59.150.39
root@OpenWrt:~# traceroute 199.59.150.39 -n
traceroute to 199.59.150.39 (199.59.150.39), 30 hops max, 38 byte packets
  123.114.32.1  14.046 ms  20.322 ms  19.918 ms
  61.148.163.229  7.461 ms  7.182 ms  7.540 ms
  124.65.56.157  4.491 ms  3.342 ms  7.260 ms
  123.126.0.93  6.715 ms  7.309 ms  7.438 ms
  219.158.4.126  5.326 ms  3.217 ms  3.596 ms
  219.158.98.10  3.508 ms  3.606 ms  4.198 ms
  219.158.33.254  140.965 ms  133.414 ms  136.979 ms
  129.250.4.107  132.847 ms  137.153 ms  134.207 ms
  61.213.145.166  253.193 ms  253.873 ms  258.719 ms
  199.16.159.15  257.592 ms  258.963 ms  256.034 ms
  199.16.159.55  267.503 ms  268.595 ms  267.590 ms
  199.59.150.39  266.584 ms  259.277 ms  263.364 ms
在我撰写的时候,这个ip还没有被封。但是根据经验,twitter.com享受了最高层次的GFW关怀,新的ip基本上最慢也是隔日被封的。不过通过这 个traceroute可以看到219.158.4.126其实就是那个之前捣乱的服务器,包是在它手里被丢掉的(严格来说并不一定是 219.158.4.126,因为ip包经过的路由对于不同的目标ip设置不同的端口都可能会不一样)。再来看199.59.150.7
root@OpenWrt:~# traceroute 199.59.150.7 -n
traceroute to 199.59.150.7 (199.59.150.7), 30 hops max, 38 byte packets
  123.114.32.1  11.379 ms  10.420 ms  23.008 ms
  61.148.163.229  6.102 ms  6.777 ms  7.373 ms
  61.148.153.61  5.638 ms  3.148 ms  3.235 ms
  123.126.0.9  3.473 ms  3.306 ms  3.216 ms
  219.158.4.198  2.839 ms !H  *  6.136 ms !H
这次同样是封IP,但是现象不同。通过抓包可以观察到是什么问题:
root@OpenWrt:~# tcpdump -i pppoe-wan host 199.59.150.7 or icmp -vvv
:46:11.355913 IP (tos 0x0, ttl 251, id 0, offset 0, flags [none], proto ICMP (1), length 56)
.158.4.198 > 123.114.40.44: ICMP host r-199-59-150-7.twttr.com unreachable, length 36
        IP (tos 0x0, ttl 1, id 0, offset 0, flags [DF], proto UDP (17), length 38)
.114.40.44.45021 > r-199-59-150-7.twttr.com.33449: UDP, length 10
原来219.158.4.198发回来了一个ICMP包,内容是地址不可到达(unreachable)。于是traceroute就在那里断掉了。
root@OpenWrt:~# iptables -I INPUT -p icmp --icmp-type 3 -j DROP
如果把unreachable类型的ICMP包丢弃掉,会发现ip包仍然过不去
root@OpenWrt:~# traceroute 199.59.150.7 -n
traceroute to 199.59.150.7 (199.59.150.7), 30 hops max, 38 byte packets
  123.114.32.1  4.866 ms  3.165 ms  3.212 ms
  61.148.163.229  3.107 ms  3.104 ms  3.270 ms
  61.148.153.61  6.001 ms  7.246 ms  7.398 ms
  123.126.0.9  7.840 ms  7.223 ms  7.443 ms
  *  *  *
这次就和被丢包了是一样的观测现象了。
root@OpenWrt:~# iptables -L -v -n | grep icmp
   168 DROP       icmp --  *      *       0.0.0.0/0            0.0.0.0/0           icmp type 3
同时,可以看到我们仍然是收到了icmp地址不可到达的包的,只是被我们drop掉了。
观测被封ip的反向流量
之前的观测中,被封的ip是ip包的dst。如果我们从国外往国内发包,其src是被封的ip,那么ip包是否会被GFW过滤掉呢?登录到一台国外的vps上执行下面的python代码
from scapy.all import *
send(IP(src="http://drops.wooyun.org/papers/199.59.150.7", dst="123.114.40.44")/ICMP())
然后在国内的路由器(123.114.40.44)上执行抓包程序
root@OpenWrt:~# tcpdump -i pppoe-wan host 199.59.150.7 or icmp -vvv
tcpdump: listening on pppoe-wan, link-type LINUX_SLL (Linux cooked), capture size 65535 bytes
:41:14.294671 IP (tos 0x0, ttl 50, id 1, offset 0, flags [none], proto ICMP (1), length 28)
    r-199-59-150-7.twttr.com > 123.114.40.44: ICMP echo request, id 0, seq 0, length 8
:41:14.294779 IP (tos 0x0, ttl 64, id 25013, offset 0, flags [none], proto ICMP (1), length 28)
.114.40.44 > r-199-59-150-7.twttr.com: ICMP echo reply, id 0, seq 0, length 8
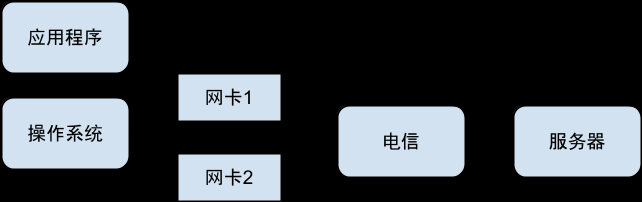
可以看到,如果该ip是src而不是dst并不会被GFW过滤。这一行为有两种可能:要么GFW认为封dst就可以了,不屑于再封src了。另外一种可能 是GFW封twitter的IP用的是路由表扩散技术,而传统的路由表是基于dst做路由判断的(高级的路由器可以根据src甚至端口号做为路由的依 据),所以dst路由表导致的路由黑洞并不会影响该ip为src的情况。我相信是后者,但是GFW在封个人翻墙主机上所表现的实力(对大量的ip做精确到 端口的全国性丢包)让我们相信,GFW很容易把封锁变成双向的。不过说实话,在这个硬实力的背后,靠的更多的是CISCO下一代骨干网路由器的超强处理能 力,而不是GFW自身。
单向代理
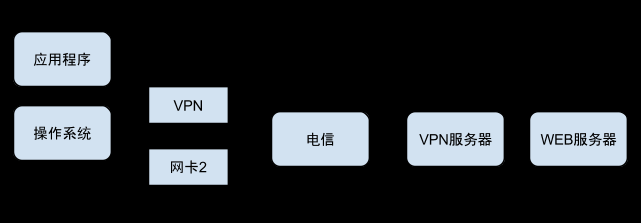
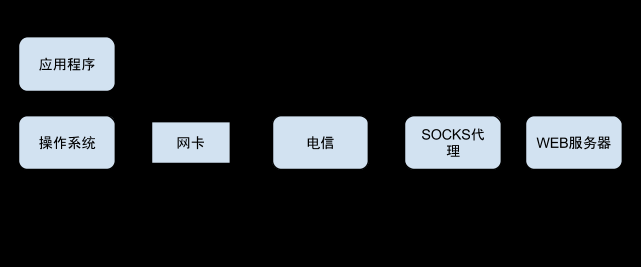
因为GFW对IP的封锁是针对上行流量的,所以使得单向代理就可以突破封锁。上行的IP包经过单向代理转发给目标服务器,下行的IP包直接由目标服务器发 回给客户端。代码与DNS(UDP协议)的单向代理是一样的。因为单向代理利用的是IP协议,所以TCP与UDP都是一样的。除了单向代理,目前尚没有其 他的办法穿过GFW访问被封的IP,只能使用传统的翻墙技术,SOCKS代理或者VPN这些。
使用中国IP访问twitter一文中有更详细的描述:
- http://fqrouter.tumblr.com/post/38463337823/ip-twitter-1-nfqueue-packet
- http://fqrouter.tumblr.com/post/38465016969/ip-twitter-2-nat
- http://fqrouter.tumblr.com/post/38468377418/ip-twitter-3-raw-socket
- http://fqrouter.tumblr.com/post/38469096940/ip-twitter-4
有一个小工具来实现单向代理: https://github.com/fqrouter/fquni
